Collecting, drying and storing your own seeds
How to collect seeds and what to do with them afterwards
Collecting your own seed is a great way to increase your plant stocks. You can save seed of perennials and annuals for planting out the following year, and you can swap saved seed with other gardeners so that you and others will have new seed to try.
Saving seed is easy and costs very little - just the time taken to collect it and then finding something to store it in, which is generally only a matter of paper envelopes and plastic bags. Here is a brief guide telling you how to collect and dry seeds and what to do with them afterwards. There is a separate page for tomato seeds: Saving tomato seeds
Why save your own seed - why not just buy it?
By saving your own seed you are not only saving yourself and others money but are also helping to ensure plant diversity. The plants that you save seed from will very likely have cross pollinated with other plants which means that over time they will become better adapted to your local conditions. You may find after a few years of saving seeds that the plants you're getting are developing different characteristics to those you first planted.
The seeds supplied by seed companies only provide a fraction of the number of varieties that could be grown and are often bred for size rather than flavour, or flower size rather than plant vigour. Cross pollination in plants ensures that plants have the genetic diversity needed to adapt to our ever-changing environment. Few would disagree that a wide genetic diversity in plants is a good thing; saving and growing your own seed encourages diversity.
Save seed from plants that have cropped well, have good flavour, colour, flower size or other attributes, such as drought resistance. As the plants will need to still be in the ground for some time after flowering (for the seed to mature) you may need to label the plant so you can remember which one to take seed from. Make notes to remind you of the plant's good points.
Collecting seed from hybridised plants
In general, seed sown from hybridised plants will not look like the parent plant and may have different coloured flowers, growth habit or vigour. This is especially true of F1 hybrids, which are the first filial generation plants from the crossing of two pure bred parent plants.
Although the offspring won’t be the same as the ones you grew, because they will have cross-pollinated with something else, they should still possess some of the traits of the parent plants. If you don’t mind getting unexpected results, it’s worth trying the seed to see what you get.
General rules for seed saving
Only collect from healthy, disease free plants and from plants with the best characteristics (in terms of colour, shape, habit and vigour). This will ensure the best quality seedlings.
Most seed of annuals and perennials is best collected when the plant is ready to drop it naturally. If collected too early, the seed may not be mature enough to germinate once sown.
Annual and perennial seed pods that split open naturally
You can often tell when seed is ready to be collected because the heads dry out, become brown and may start to split open.
The seed itself often darkens as it dries. In dry weather, especially in mid to late-summer, this can happen very quickly so you will need to keep a close eye on the plants that you want to collect seed from.
Cut the dry seed heads off and keep them in a paper bag in a dry place until the seed heads are completely dry.
When they are dry, tip the bag out onto a flat surface and separate the seeds from the casing and other debris. Look out for any small insects that may be present and make sure they don’t get into the stored seed.
Discard any seeds that look shrivelled or damaged.
Store the dry seed in paper envelopes (don’t forget to label and date them) sealed in a plastic bag and keep them somewhere cool and dry.
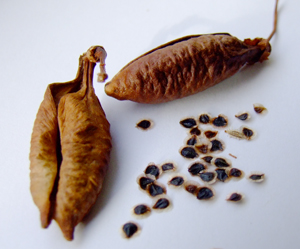
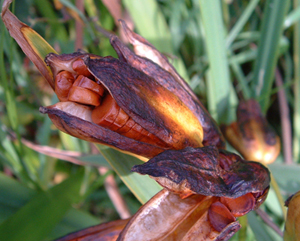
Eccremocarpus scaber seeds and pods
Eccremocarpus scaber seeds close up
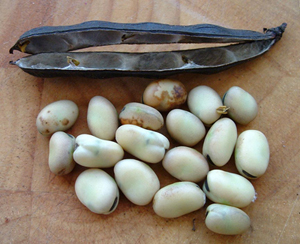
Drying broad beans
Peas and beans
Pick the peas and beans as the pods begin to dry slightly and turn buff or yellow. If the weather is fine, they can be dried on the plant and picked off when the leaves are dropping.
If the weather is poor, cut the stems and hang them up in bunches somewhere dry and wait for the pods to turn brittle. Once they are dry, the pods snap open easily to release the seed. Store in the same way as perennial seed.
You can see when broad beans are ready for drying because the place where the bean joins the pod - showing as a black line in the picture - turns from green to brown or black. As the beans dry out they will darken either to brown or dark green.
Catkins and cones
Seed from catkin bearing plants, like birch, should be collected before they are ripe. If you leave them on the plant until they have ripened, the seed will probably already have fallen.
Cut the catkins and keep them in a paper bag in a dry place until dried, when the seeds can then be collected.
Collect birch catkins in early to mid-summer. Break them up to release the seed and either sow it fresh or store it in an airtight container in the fridge.
Gather cones before they have opened and keep them in a warm dry place. In this situation, the cones will open and the released seed will probably fall out on its own; if not it can be gently shaken out.

Downy birch catkins
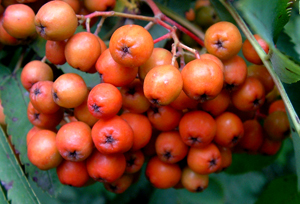
Ripe rowan berries
Fleshy fruits and berries
Some seed is better collected before it is fully ripe as, if it does ripen, the seed becomes dormant. This can often be the case with fleshy fruited trees such as hawthorn and rowan. In this case, collect healthy looking berries that have not quite coloured up.
Berries should be gently crushed to reveal the seeds and then washed in a sieve. The seeds can then be separated from the pulp and dried out on paper in a dry place.
Fleshy fruits like apples or peaches should have the fleshy portion cut away. The seeds can then be separated, washed and dried ready for storage.
There is a separate page on tomato seeds: Saving tomato seeds
Don't forget to label and date the envelope
Seed dormancy
Some seeds go dormant once they are ripe, to protect themselves until the right conditions are met for germination, so that they don’t start growing when conditions are unsuitable. The dormancy must be broken before they will germinate and there are various ways to go about it, depending on the type of seed and dormancy.
Many tree, shrub and alpine seeds need a period of cold in order to germinate (usually called stratification), which replicates the winter chilling they would experience if they were growing naturally. Such seed is best sown as soon as it is ripe but if this isn’t possible, the seed needs a period of artificial chilling before it will germinate.
To do this, sow the seeds in moist a seed compost mix in a sealed plastic bag and leave for two to three days so that they can take up water and swell. Now put the bag in the coolest, but not freezing, part of the fridge.
There is often a wide variation in time taken for saved seeds to germinate and you may need wait anything from three to 18 weeks. Check the bag regularly, opening it to let air in and mixing carefully to keep the compost loose. Remove any seed that is showing signs of mould or rot.
As soon as any of the seeds split open or show signs of growth, like putting out a root, remove them and pot them up.
Seed can also be sown in pots and left outside for the winter, either in a cold frame or with the pot buried in a border.
Some seeds have hard coats and need to be either soaked to soften them, or have the shell chipped or abraded (called scarification) to let water in. Sweetpeas and lupins, as well as tree seeds with very hard coatings, are often scarified to encourage germination.
One of the easiest ways to scarify seed is to line a jar with sandpaper, put the seed in, lid the jar and then shake it until the seed casings have worn down enough so that water can be taken up.
Germination tests on saved seed
If you plan to keep seed for more than 12 months, it is worth carrying out germination tests every so often to ensure that the seed is still viable.
Lay some seed out on damp tissue and keep it covered in a warm place - a plastic box with a couple of holes in the lid, placed in an airing cupboard would do. Check the seed every few days to see how much has germinated. If more than a week passes with no more seed germinating then that gives you a good idea of how viable the seed is. For example, if eight out of ten have germinated, you might want to consider regrowing them and collecting new seed. If only half of them germinate, you should definitely grow them for fresh seed.
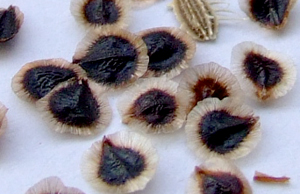
Iris pseudacorus seeds look a bit like toffees...
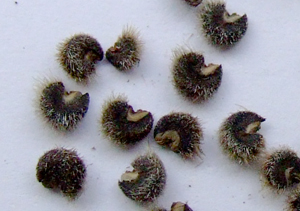
and Malva seeds remind me of miniature hedgehogs
A word of caution
Many seeds look very attractive, but they are not sweeties - don't eat them!
© Copyright Miranda Hodgson 2007