Jan 24th 2005 - Apples and turf
We have a mature Bramley’s seedling apple tree in a corner at the back of the house. It was in a bit of a sorry state when we moved in but we’ve been renovating it, cutting out canker and crossing limbs and feeding it and I think it’s looking a lot better these days. Whoever pruned it initially, had treated it as a shrub and just nibbled round the edges, without taking any wood from the centre, so it was very overcrowded.
"...Apple wood has a wonderful scent."
The cutting we’ve done over the last couple of years has opened it up a lot. We've also had the benefit of the wood to put on our open fire. Apple wood has a wonderful sweet scent when it burns and we’ve come to call it Luxury Wood, to be put on at the front of the fire so that the fragrant smoke wafts out.
The area directly under the tree is currently grass. Because there are several bird feeders hanging in the tree, the grass gets very messy with seed husks and droppings and we also find that seeds germinate in it. It can look very untidy and is awkward to mow round to boot. I’ve been looking at it for some time and wondering what to do.
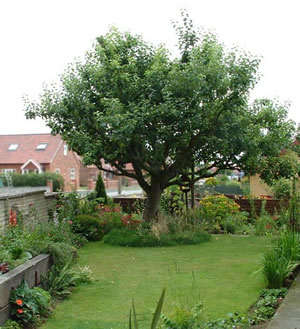
"...Why I didn’t think of it before I can’t say, but what seems like a good idea is to simply remove the grass in the drip area and create a sort of woodland edge area"
Why I didn’t think of it before I can’t say, but what seems like a good idea is to simply remove the grass in the drip area and create a sort of woodland edge area. Cyclamen coum, Galanthus nivalis, Helleborus niger and Primula vulgaris are just a few of the plants that would work well in this spot, with a few ferns set round the edges.
Once the plants are in I shall put down a thick mulch of chipped bark and wood, which will discourage fallen bird seed from establishing itself. The birds will be able to fling the bits about, as is their wont, and the ground feeders should even blend in better with the brown colours of the wood chips. The seed husks and droppings certainly won’t show up as much.
Having made the decision to take the grass up, I was in a bit of a quandary about how to actually do it. We decided when we moved here that this is to be an organic garden, for wildlife as well as for us, which means that a powerful weed killer like glyphosphate is out of the question.
No point in encouraging the wildlife and then spraying everything with chemical death. There are organic weed killers based on fatty acids but I read on the Henry Doubleday site that they shouldn’t be used in the organic garden as they kill insects.
So far, the only chemicals used in the garden have been a couple of dustings with Derris and a few squirts of fatty acid spray on some extremely persistent aphids (to be honest, I found that a blast from a hose-pipe was just as effective). Anyway, another option would be to put down some weed suppressant sheeting, but that would prevent the plants from spreading naturally, which is what we want to see, so that’s out, too.
Then, there is that wonderful traditional tool, the turf lifter.
Then, there is that wonderful traditional tool, the turf lifter. I first saw one of these at Bishop Burton agricultural college at Beverley. It’s like a spade, but not quite. The blade is quite flat and leaf shaped while the handle is bent upwards near the blade, meaning that you can get good leverage.
Before, I’d taken turf up using a lawn edging tool and an ordinary spade but after one use of the turf lifter I was converted. It makes the job far easier and quicker and you can skim off a thin layer with surprisingly little effort.
"Typically, there’s a queue for it but there’s now only one person in front of me so..."
Having prodded about the base of the tree with a fork to assess the soil depth I think it’s safe to use the lifter without causing any damage to the tree’s roots. We don’t have a turf lifter of our own yet so I’ll borrow my RHS teacher’s. Typically, there’s a queue for it but there’s now only one person in front of me so, all being well and weather permitting, we should get it done in the next week or so.
I have next to my desk a pot of root cuttings, Papaver orientale and Acanthus spinosus. We took these cuttings on January the 5th, a day of clammy cold that had the whole class shivering, even in the sheltered polytunnel. We rummaged through the chilly clumps of plants, looking for pencil thick roots growing close to the plant and then cut sections about 5cm long. The roots are inserted vertically into moist compost mixed with perlite. To make sure that you don’t put them in upside down (which could happen so easily), the top of the root is cut horizontally and the bottom end is slanted.
Hardy perennials with fleshy roots are ideal for root cuttings and suitable plants include Papaver, Verbascum, Echinops retro, Humulus lupulus and Phlox paniculata. Root cuttings are especially suitable for plants that resent disturbance, and are ideal for Phlox if they have been attacked by eel worms, since the worms do not live in the root and clean plants can still be propagated. This method also ensures that if the parent plant is true to type, the resulting plant will be too.
The Papaver should have a large pale pink flower, whilst the Acanthus will be tall with very spiky leaves and straight stems bearing hooded flowers in smoky mauve, veined with green. Both will get quite large, with the Acanthus reaching up to 120cm in both height and spread. Hopefully, by the time the cuttings put out shoots, which should be within six to eight weeks, I shall have some idea of where I could put them.
© Copyright Miranda Hodgson 2005